Good compost is vital to your garden’s health. Though it can be bought in stores, nothing compares to producing your own compost at home. The breaking down of your own kitchen waste tossed into the bin is incredibly fulfilling as you know you’re contributing to your garden’s health and shrinking your waste. But how do you know if it’s good homemade compost? We’ve got the answers here for you.
How To Test Compost Quality
How to test the quality of your compost? There are five ways to test the quality of your compost pile:
- Test the maturity of your compost.
- Check the color and texture.
- Check the odor.
- Check its temperature.
- Send a sample to a compost/soil-testing agency.
Testing the quality of your compost is essential to the productivity of your garden (especially for homemade compost). Applying low-quality or immature compost to your garden can damage the soil and plant life, so it is important to know when and how to test your mixture. Your methods might also differ based on what composting methods you choose: hot, cold, or vermiculite.
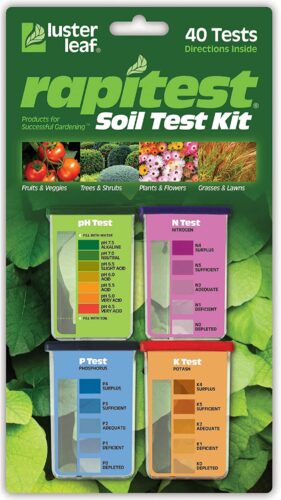
Using A Soil Test Kit
In many cases, I have found that the easiest and most reliable way to test the quality of my compost, has been to use a reliable soil test kit.
These kits are easy to use and come with everything needed to give you reliable readings about the soil pH, Nitrogen, Phosphorus and Potash
To use a soil test kit, like the Rapitest soil test kit, you simply need to collect a sample of soil from your finished compost and mix it with the appropriate tablets provided. The results show up as a color and you compare your sample with the ones provided.
The rapitest kit also comes with an optimal Soil pH preference list for over 450 plants to help you determine where your compost and garden levels are.
Based on the results of the test, you can then determine what amendments or adjustments may be needed to improve the nutrient levels and pH of the soil. This can help ensure optimal growing conditions for plants and vegetables.
Testing Your Compost for Maturity
One of the things you will need to test your compost for is maturity. Before proceeding to test the quality, you need to be sure that your compost is ready to use. Using your compost before it’s reached maturity can harm your garden, so it is important to remember the significance of allowing your compost to have actually finished the composting process before applying it to your garden. Here are a few ways to do test your compost’s maturity.
Maturity Testing; Avoiding The Use Of Immature Compost
In order to become valuable compost, your collection of garden and food waste needs oxygen in order to properly decompose. Placing it in your garden while it is undergoing this process will inevitably lead to your compost stealing valuable elements that your plants’ roots need, doing more harm than good.
- To start, divide your compost bins or other containers into two sets of three, four, five, or six (however many trials you are willing to do. Two will not be enough to compare).
- Label the containers of one set as “Control,” and the others as “Experiment” or “Compost.” Make sure to record the date on the containers!
- For the Control bins, fill them with a standard potting soil mix.
- Next, fill the Experiment containers with a mixture of potting soil and your compost sample. Plant up to six seeds in each container and water them – it is suggested that you place each set of containers in the same location in your nursery or gardening area, to eliminate any possibility of external influences (amount of light, temperature, etc.) on germination and plant growth.
- Keep the soil moist over the next week and record the dates on which the seeds germinated and keep track of growth per container.
- Compare the results. If the Experiment bins produced less germination than the Controls, your compost is immature and will need to give it another month to mature.
As a bonus, this makes a great learning experience and science experiment for any of the younger people living or visiting your home!
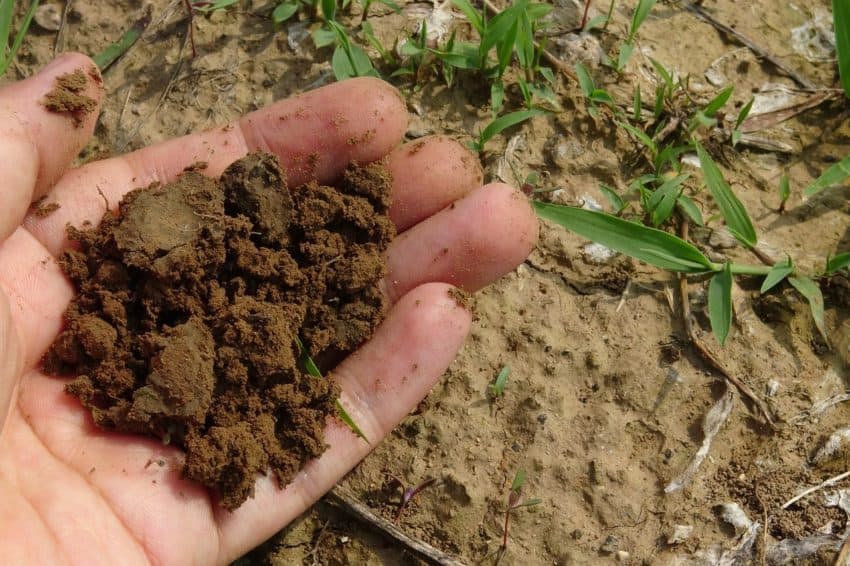
2. Check the Color of Your Compost
Another telltale sign of the quality of your compost is its color and texture. Good compost will be a rich brown or dark brown and crumbly to the touch. It will be dry and crumble between your fingers like coarse sand.
Checking the moisture content of the compost is fairly easy. If you take a handful of your mature compost and squeeze it as tight as you comfortably can, the compost should not release any watery material out like a sponge would when you ring it. Instead, the clump of organic matter in your hand should stay together lightly and easily crumble as you move it around in your hand.
On the other side of that, dry compost should also be avoided because when there is no moisture in your pile or bin, the composting process ceases and your organic materials will just sit there and stop making compost.
It should not be wet or stick to your fingers like mud. Wet compost does not have enough oxygen and micro bacteria in it to properly break down your organic matter, and instead will start to rot. However, with the proper compost set-up, this should not be the case. See the Different Types Of Compost page for more on that.
Additionally, you should be able to identify pieces of the materials that made up your compost. Now, there shouldn’t be whole banana peels in your compost, but little bits of eggshell, newspaper, or dead leaves are acceptable here and there.

3. The smell of the Compost
This is perhaps one of the most important methods of knowing the quality of your compost. Your compost should never have a bad or pungent odor! Luckily, this is one of the easiest traits to test.
Your compost should never smell like what you would expect from a pile of decomposing organic materials. When a compost pile or bin is properly balanced with organic matter, in its Carbon-to-Nitrogen ratio (ideally 1:1 or just a bit greater), compost should simply smell like freshly turned earth. It should never smell like decaying wood or other organic compounds.
I go into much further detail on why a compost pile smells here.
What makes up this Carbon-to-Nitrogen (C: N) ratio is the amount of “brown” materials you have in the bin versus that of “green” components. Even though it’s easy to do, some seasons will give us more of one than the other. The trick is finding the right ratio of browns to greens all season long for making the best compost quality.
Brown and Green Compost Materials
Brown materials you can add to your compost pile include fallen leaves – dead fallen leaves. Living leaves will have an entirely different chemical makeup and fall into the category of green materials. Hay, paper, cardboard, eggshells, tea bags, sawdust, and fireplace ashes are a few more examples of the brown material that will make up your compost.
Brown materials are high in carbon and provide a strong source of energy for the microorganisms (and/or worms) breaking down your plant and food waste. Be careful not to add glossy paper or wood that has been treated in any way so as not to introduce any dangerous or foreign compounds to your compost pile. Regarding ashes, be careful not to add too much to avoid throwing off the pH levels.
Green materials, on the other hand, contain significantly more Nitrogen, which is important to plants for the creation of amino acids. It also aids plants in providing a source of protein to microorganisms in the soil, which aids in speeding up the decomposition process. These materials should be used in moderation.
Examples of green materials are vegetable peels, clippings of grass, fresh manure, coffee grounds, seaweed, and fresh cuttings of garden plants. There are many different kinds of manures you can use in compost: chicken, sheep, horse, cow, and rabbit are the most popular options. Never use it fresh, though – let it break down first.
(Also, never use the manure of meat-eating animals – including pigs – or humans to avoid the potential spreading of diseases.)

4. Checking the Temperature of Your Compost
Another way to test your own compost at home is by checking the temperature of your mixture. As the microorganisms break down the materials in the container or pile, they and the natural process of all plants, food, and other materials breaking down will generate heat. Your compost pile should exude a moderate amount of heat, meaning it should never be cold or too hot.
The benefit of heat for your compost pile is that any pathogens and seeds of weeds will be destroyed in the pile, getting rid of any chance of you or your plants getting sick.
The temperature for a healthy compost pile will fall anywhere between 90˚ to 140˚ Fahrenheit. Your compost pile will reach these temperatures when it is at least 3 feet tall, 3 feet wide, and 3 feet deep. The temperature will rise and change from the center first and may experience fluctuations in its development.
Temperatures may fluctuate due to the material composition of your compost pile and aeration. Additionally, the ideal size of your compost pile will change depending on whether it’s stored within a container, indoors, or outdoors. Compost that is stored in a container will likely heat up faster than those that are exposed to the elements.
I have also created a complete list of composting tools availableto help you produce the best compost possible.
5. Professional Biochemical Compost Test
The last option for testing the quality of your compost is to hire a professional agricultural company to do so. This is less an option for individuals that maintain a family or hobby garden, and more for those running a farm or growing produce on a large scale.
Professional agricultural companies, or even universities like Penn State, for example, offer their services for assessing the biochemical makeup of compost samples. Penn State offers tests for the C: N ratio of your sample, analyses for organic matter, soluble salts, and more. They will also test for micronutrients your plants need as well, including phosphorus, calcium, manganese, sodium, and more.
They will also test for possible pollutants in your sample, in case the compost is being used to grow feed for livestock. Pollutants being tested for include arsenic, lead, mercury, and more. You can order these tests based on the size of your sample and the type of test you’re looking for.
Purchasing A Test Kit For The Compost Pile
As I mentioned earlier in this post, testing compost quality by purchasing a reliable soil test kit will allow you to easily check the quality of the finished compost and give you an idea of the basic soil structure of the garden.
These kits are easy to use and come with everything needed to give you reliable readings about the soil pH, Nitrogen, Phosphorus, and Potash
Do some searching and, based on your need and type of production, see what testing alternative will be best for you.